Best Exercises for Sciatica Pain Relief | Low Back Pain Relief
Hello guys today we have came up with an article and a video which a lot of you have asked for “sciatica pain management”. Sciatica pain is something that starts from lower back and goes from the Buttocks, thighs and sometimes to the legs and feet also. These pain are sometimes very excruciating and it is really important to manage it. Yes, you can manage with all these exercises that we are going to explain and Dr Vinayak Jyoti is going to show it to you. So follow it properly. Read this article till end and follow all those excises properly and let us know in the comments below how you feel after that. So Let’s get started.
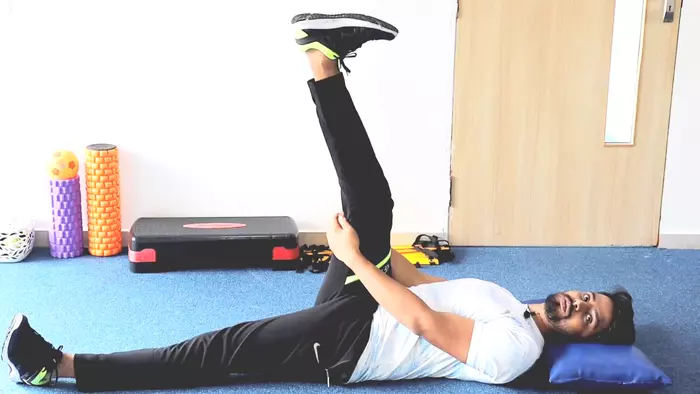
1. Sciatica Nerve Flossing
The first exercise is nerve flossing. For this you just lie down on the floor on yoga mat or on the bed and then straighten the unaffected leg and just hold the affected leg at 90 degrees and then slowly you lift it as much as possible. So you should start feeling a little bit of tingling sensation, a little bit of pain, little stretch around the hamstring area. Keep maintain that and then you pull your toes towards you and then relax and again pull your toes towards you and relax. Do it 2 -3 times and relax the leg, now do this for the other leg as well. And check how much do you feel, are you feeling the the same? Repeat this for about 10 times.
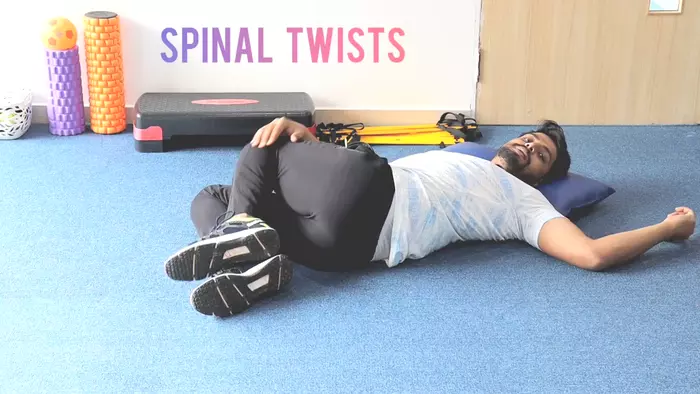
2. Spinal Twist
The next exercise is spinal twist. For this you have to lie down on the same position. Now we are slowly going to turn the legs towards one side, making sure your shoulder remain down at all the time. Increase the stretch just with the other hand we just push it a little bit, hold the stretch for around 5 to 10 seconds and then do it on the other side slowly and gradually. Do it for about 10 times on each side.
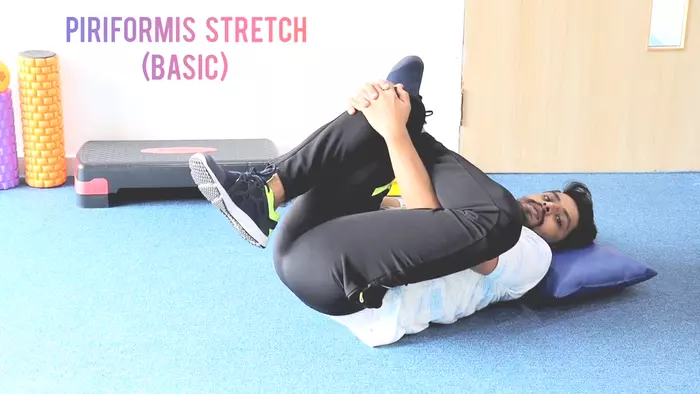
3. Piriformis Stretch
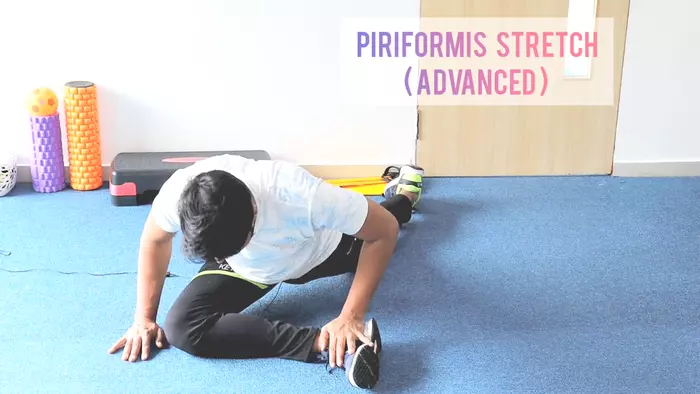
The next exercise is Piriformis stretch. We are going to tell you the two versions of Piriformis stretch : one is basic and one is advance. Basic one is the first one. Advance will be the next one. Choosing the basic or advance version completely depends on how much pain you have, if you have too much pain, you’ll do the basic version first and then slowly progress to advanced version.
Basic version: Keep the leg like this one on top of the other. You put it like this and then hold the shin bone of the leg. You have to just pull it towards you as much as possible. When you’re doing it, you should feel a little stretch on your glutes. There should be no pain on the hip. Pain should be on the stretched glute area. So once you start feeling the stretch, hold this stretch for about 10 to 15 seconds. Do it slowly and then repeat it. Do it for about 3 to 5 times on each side.
Advanced Level: This is also called as pigeon stretch. So in this you’re going to sit like this and take your hand and put it on one feet. Other hand will be on the side. Other leg will go back as much as possible. We are just going to hold it and then try to go down as much as possible. So once you’ve gone down, you should start feeling the stretch again at the same Piriformis area. In case you are not feeling the stretch as much, you can further Bend down, hold it for about 10 to 15 seconds and repeat it for 3 to 5 times on each side.
4. Quadriceps Stretch
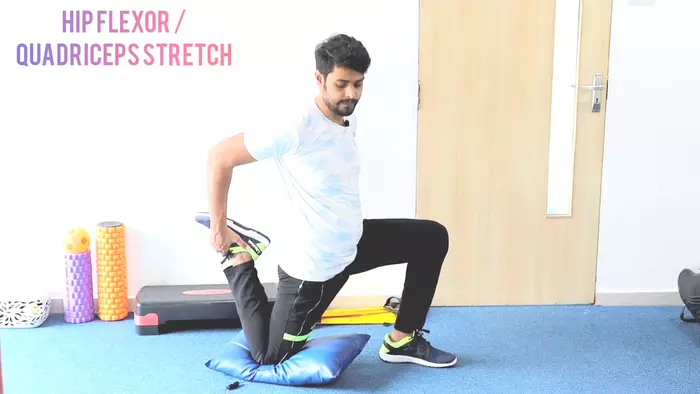
The next exercise is the quadriceps stretch. Usually what happens is while sitting and all your hip flexor muscle gets tight. So these also can impact your lower back and that can lead to your sciatica pain. It is very important to release these as well, the hip flexors or quadriceps. So just for the Hip flexor we are going to go forward and we’re going to get a little hip flexor stretch. A little stretch would be good enough and then relax. To include the quadriceps muscle we’re going to go in the same position and pull the leg a little more towards you. Here Dr Vinayak Jyoti is keeping a pillow to protect the knees and in case you’re doing it on the yoga mat or on the soft bend this is not required. Do this stretch for about 10 to 15 seconds and repeat it again for about 3 to 5 times.
5. Hamstring Stretch
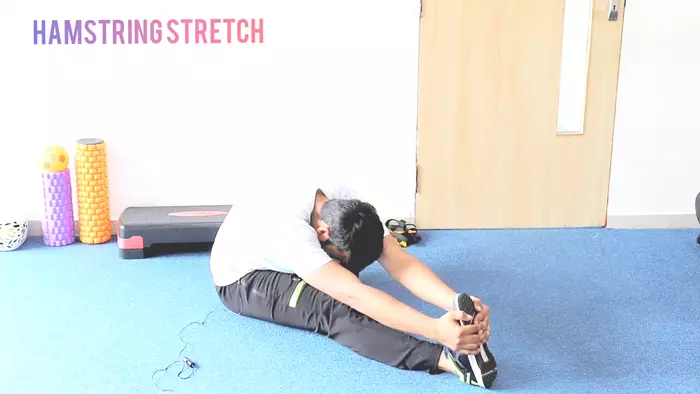
The next stretch is hamstring stretch, hamstring are the muscles at the back of your thighs and we’re going to stretch that. Just bend one leg like you are making a letter ‘P’, make sure your other leg is straight and then you keep your back straight. It’s very important to keep your back straight. A lot of people just arch their back while doing this, which is not right. You have to keep your back very much straight and then bend as much as possible towards the toes. If you cannot touch it, it’s fine. You can just hold your Shin bone, but for those who can touch that’s it and bend as much as possible. So in this case you’ll be stretching your hamstring as well as your calf a little bit. Do it for both the sides one by one. Don’t do it together. Hold it for about 10 to 15 seconds and repeat it about 3 to 5 times. This will help you in eliminating Sciatica pain.
6. Prone SLR or Prone Straight Leg Raising
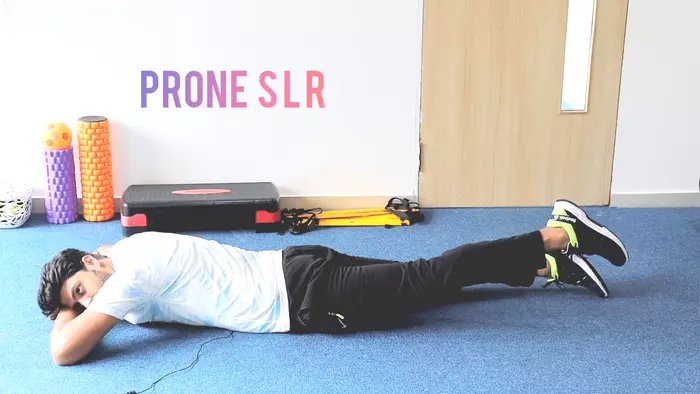
The next exercise is Prone SLR or Prone straight leg raisings. For doing this exercise you just lie down comfortably with belly facing the ground on your yoga mat or floor and lift your leg. It is very important to make sure that you don’t lift too much. It’s also very important to keep your hip stable. Hips must not get lifted while you are lifting the leg. So keeping the hips stable you just lift your leg. You have to lift your knee but you don’t have to lift your hip. After lifting just hold it for about 5-10 seconds and repeat it 10 times.
7. Glute Bridge
The next exercise is glute bridge. Usually the glute bridge is done wrongly. Generally what people do is they just arch their low back which is not right. First we are going to work on the glutes and then lift it up by squeezing the glutes as much as possible. Make sure your leg is not too close to each other or not too far. Then we’re going to work on the pelvic movement, just lift it up. Make sure you are engaging your glute muscle and then slowly working towards the lift. You will feel the squeeze in the glutes and there should not be any arching on the lower back. When you do this, you will feel your glute muscle contracting and it is a very nice feeling. These glutes muscles will help you to support your lower back and ultimately the strain on the lower back reduces and your sciatica pain will also come down.
8. Core Presses or Core Bracing
The next exercise is core presses or core bracing as we also say that. For this you need to lie down with your back facing the floor and keep your one hand under the curve area of the lumbar spine and then you’re going to put some pressure on that area of the hand. Now you should be able to feel the pressure on the hand while you’re pressing it. But make sure that you are breathing normally. You should not hold the breath in this exercise. The movement is very mild, but you will feel it. It is very important to engage your core muscles. Your core muscles are like a belt for the whole lower back. When you engage your core muscles again, you feel very much comfortable on your lower back. Lower back muscle will relax and then your sciatica pain is going to be reduced. So this exercise again, you’re going to do it for about 5 to 10 seconds of hold and repeat it for 5 to 10 times depending on your capability. Initially you will be doing it a little less, but slowly you will able to progress it.
Do all these exercises carefully by keeping all the important things which Dr Vinayak Jyoti have told you in mind. It is not important that how many times you do it but how you do it matters, so do it right. You will get relief from Sciatica Pain, If you follow these exercises carefully. You can also read it again or watch this video again and again for any doubt.
Also Read: Heat or Ice? Which is good for pain relief ?
Share it with others…



Thank you Sri VINAYAK garu….very much educating…
Thank you and do share it with others who are suffering from Sciatica Pain or low back pain
Thank you so much for the great and effective work out videos Dr. Vinayak.. Really appreciable 👏👏
Thank you so much Ma’am